

Your eSIM Card Is the Only Travel Fix You Need Right Now
Have you ever wondered why your phone still needs a physical plastic card to connect to a network? An eSIM card is a digitally embedded SIM that lives directly on your device’s motherboard, eliminating the need for a removable chip. It works by downloading a carrier profile over the internet, which you can activate instantly via a QR code or an app. This allows you to switch between mobile plans without swapping cards, and it makes managing multiple numbers on a single device effortless—a truly seamless connectivity solution.
What Exactly Is an Embedded SIM and How Is It Different from a Physical One?
An embedded SIM (eSIM) is a tiny, soldered chip permanently installed inside your device’s motherboard, replacing the removable plastic card you physically insert. Unlike a physical SIM, which you swap between phones, an eSIM cannot be taken out; instead, you download a digital carrier profile directly onto the chip via a QR code or an app. This means switching networks involves scanning a new code rather than hunting for a tray or risking a lost nano-SIM. A physical SIM ties you to one carrier until you replace it, while an eSIM lets you store multiple profiles and toggle between them in settings. For travel, you can activate a local data plan instantly without buying a plastic card. The practical difference is simple: the eSIM is built into your hardware, making activation faster, more flexible, and immune to physical damage or theft.
The Core Technology: A Chip Soldered Straight Into Your Device
The heart of an eSIM is a tiny chip, physically soldered straight onto your device’s motherboard during manufacturing. Unlike a removable SIM, this chip is embedded, meaning you can’t pop it out or swap it between phones. This soldered-in eSIM chip design frees up internal space, allowing for slimmer devices or larger batteries. It also eliminates the SIM tray, which improves water and dust resistance. Functionally, the chip holds the same secure data as a classic SIM, but you manage profiles through software. If your device breaks, the chip stays with it, not in your old SIM card. This permanent integration is the core technological shift from physical to embedded.
Physical SIM vs. Digital Profile: Key Differences in Size, Flexibility, and Lock-in
The most tangible shift from a physical SIM to an eSIM is the elimination of the plastic card itself; a physical SIM demands a tray and occupies space, while a digital profile is mere data written directly onto your device’s embedded chip. This size advantage unlocks real flexibility: you can switch carriers or plans in minutes via a QR code or app, without waiting for a shipped card or hunting for a pin to eject a tray. However, this digital freedom introduces a distinct lock-in mechanism tied to your device’s hardware—unlike a physical SIM, which you can pop out and insert into any phone instantly, a digital profile is tied to that specific eSIM chip until you are allowed to transfer or re-download it. Thus, while you lose the physical object, you gain a portability layer that is only as good as the carrier’s transfer policy and your device’s compatibility. The practical trade-off is clear: instant remote provisioning versus a less obvious, software-based binding.
- Physical SIM is removable and works in any unlocked device; a digital profile requires a compatible eSIM chip and a transfer step to move.
- Size: a physical card consumes a slot; a digital profile takes zero physical space but occupies a small amount of device memory.
- Flexibility favors eSIM for quick plan changes, but physical SIM wins for swapping between multiple phones instantly without contacting a carrier.
- Lock-in: a physical SIM’s lock is tied to the carrier account; a digital profile’s lock is tied to both the carrier and the device’s embedded chip.
How Does the Activation Process Work for a Built-In Mobile Chip?
Activating a built-in eSIM chip begins when your carrier provides a QR code or confirmation code, which you scan via *Settings → Cellular → Add eSIM*. The chip’s embedded secure element validates the encrypted profile (SM-DP+ address) over a network connection, then downloads and installs the carrier credentials directly onto the chip—no physical card swap. Once installed, the profile becomes active immediately, though some carriers require a restart or manual selection of the new line under *Cellular Plans*. The chip’s activation is purely software-driven, meaning you can erase or re-download a profile at any time. Q: Can you reuse the same eSIM after erasing it? A: Yes, if your carrier re-issues a new QR code or allows a remote re-activation, but the old profile is permanently deleted from the chip.
Scanning a QR Code: The Standard Way to Download a Mobile Plan

Scanning a QR code is the most common method to provision an eSIM because it directly encodes the activation details—SM-DP+ address, confirmation code, and activation token—into a scannable format. After you purchase a plan, the carrier displays a QR code in their app, email, or on their website; your device’s camera reads it, and the OS automatically downloads and installs the corresponding eSIM profile without manual entry. This eliminates typo-related errors that plague manual input, though the code itself is typically single-use and expires after one successful download. Once scanned, you confirm the installation, and the plan becomes active within seconds. For most users, this is the fastest and most reliable path to adding a cellular service. QR-based eSIM activation streamlines carrier onboarding by reducing setup to a single camera action.
Scanning a QR code turns a multi-step carrier configuration into a one-tap download, making it the standard, error-free way to activate a built-in mobile chip.
Manual Entry, App-Based Setup, and Carrier-Provided Activation Codes
For a built-in mobile chip, activation hinges on three practical methods. **Manual entry, app-based setup, and carrier-provided activation codes** represent the core user pathways. Manual entry requires typing a QR code’s numeric string into the device’s cellular settings, which is useful when scanning fails. App-based setup involves installing the carrier’s dedicated application, which automatically fetches and installs the eSIM profile after login. Carrier-provided activation codes, often delivered via SMS or email, are entered directly into the system to trigger profile download. Each method ultimately writes the same profile data onto the embedded chip, with the BazTel choice depending on user preference and carrier support.
Q: What is the fastest activation method? App-based setup is typically fastest because the carrier pre-validates your account and pushes the profile without manual code entry, though QR scanning still remains the most universal fallback.
What Are the Real-World Benefits of Switching to a Software-Based SIM?
Switching to a software-based SIM (an eSIM card) means you never have to wait for a physical chip to arrive or fumble with a SIM tray again. The real-world benefit is instant connectivity: you scan a QR code or tap in a carrier profile, and you’re online within minutes, even while traveling abroad. Because the eSIM card lives entirely in your phone’s hardware, you can juggle multiple plans simultaneously—say, one for work and one for personal use—and switch between them in your settings without swapping cards. This is a lifesaver if you travel often, as you can buy a local data plan remotely right after landing. Plus, if your phone is stolen, you can remotely erase the eSIM profile, which is far more secure than trying to track a removable card.
Travel Without Roaming Nightmares: Swapping Local Profiles in Seconds
The real magic of an eSIM card is killing the airport SIM-hunt and the carrier-store queue, because you can swap local profiles in seconds the moment you land. Instead of wrestling with a roaming plan that drains your wallet, you scan a QR code or tap an app, and your phone instantly connects to a local network at local prices. Stopping for coffee becomes your entire setup process, as the old corporate profile stays dormant and untouched in your settings until you return. This means no more fumbling with a paperclip for a nano-SIM tray or worrying about losing your primary number while abroad. Switching to a regional data plan mid-trip takes less time than boarding the train, keeping your map, rideshare, and translation apps alive without interruption. You simply toggle profiles, pay the local rate, and keep moving.

Running Multiple Numbers on One Device: Separating Work, Personal, and Data Lines
Juggling a work number, a personal line, and a tablet data plan used to mean carrying three gadgets. With an eSIM, you can store all these profiles on a single device. That means your iPhone or Android can host your office line for Slack calls, your personal number for family texts, and a separate data-only eSIM for hotspotting your laptop—all without swapping physical SIMs. It’s a clean, software-level split. **Switching profiles takes seconds in settings**, so you never miss a message, and your billing stays separate. This is perfect for freelancers or anyone who wants one phone, not three.
Q: Can I keep my work and personal numbers active at the same time on one eSIM phone?
A: Yes, most modern phones support dual active eSIMs, meaning both numbers ring simultaneously—you just pick which one to answer. You can also set default lines for data or calls.
Which Devices Support Digital SIM Technology and How Can You Check Yours?
Figuring out which devices support digital SIM technology is easier than you think. Most modern eSIM card compatibility boils down to recent smartphones, tablets, and smartwatches. Apple iPhones (from the XS/XR onward), Google Pixel phones (starting with the Pixel 2), and Samsung Galaxy flagships (from the S20 series) generally include the hardware. To check your device, open your settings—on iPhone, go to Cellular, then “Add Cellular Plan”; on Android, look under Connections or Network & Internet for “SIM manager.” If you see an option to scan a QR code there, your phone is eSIM-ready. For laptops or watches, check the manufacturer’s spec sheet under “Cellular” or “Connectivity,” since not all models in a lineup support it. When unsure, contact your carrier with your IMEI number—they can instantly verify compatibility for you.
Recent Smartphones, Tablets, and Smartwatches with Built-In Support
Recent flagship smartphones from Apple, Samsung, and Google—such as the iPhone 15 series, Galaxy S24 lineup, and Pixel 8—come with native eSIM support, allowing you to activate a cellular plan without a physical SIM tray. Similarly, current iPad Pro and iPad Air models include built-in eSIM, enabling data plans directly on the tablet. On the wearable front, the Apple Watch Series 9 and Galaxy Watch 6 offer standalone eSIM connectivity, letting you make calls and stream data without your phone nearby. To verify support, check your device’s settings menu for “Cellular” or “Mobile Data”; if an option to add a plan appears, eSIM compatibility is confirmed. For Android devices, dialing *#06# may also show an EID number, indicating built-in eSIM hardware.
How to Confirm Your Handset Is Ready for a Remote SIM Profile
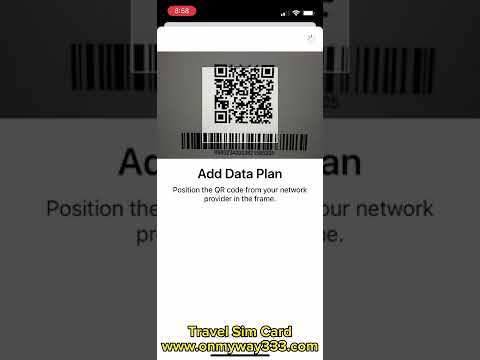
To confirm your handset is ready for a remote SIM profile, start by dialing `*#06#`—if an **EID (Embedded Identity Document)** appears, your device natively supports eSIM provisioning. Next, navigate to *Settings > Mobile Network* and look for “Add eSIM” or “Download SIM”; its presence signals carrier-profile readiness. Ensure your device isn’t carrier-locked, as locks block remote profile activation. Also, update your OS to the latest version—stale firmware frequently disables the eSIM manager. Finally, verify that your phone’s IMEI matches the one on your carrier’s whitelist; mismatches cause immediate profile-install failures. If all checks pass, you’re set to scan a QR activation code or manually enter SM-DP+ details.
Step-by-Step Guide: How to Install, Switch, and Manage Your Digital Mobile Plan
To install your digital mobile plan via eSIM card activation, scan the QR code from your carrier’s app or email; the profile downloads automatically to your device. For switching, open your phone’s cellular settings, select the active eSIM, and toggle off the old line or choose “erase eSIM” to free storage. Managing multiple plans is straightforward—label each eSIM (e.g., “Work” and “Personal”) to avoid confusion, then assign default lines for voice, SMS, and data independently. When traveling, keep your primary eSIM active for calls while enabling a secondary data-only plan. Always check carrier-specific setup guides, as Android and iOS menus differ slightly, but the core process remains QR scanning and profile prioritization.
Adding a New Data Plan Without Touching a Physical Tray
Adding a new data plan without touching a physical tray is a core advantage of eSIM technology, as the entire process occurs through software. You typically open your device’s settings, navigate to the cellular or mobile data section, and select “add data plan.” The phone then scans a QR code provided by your carrier or lets you enter activation details manually, which downloads the profile directly to the embedded chip. No SIM ejector tool or tray removal is ever required, eliminating the risk of damaging the slot or losing the tiny card. This method also allows you to store multiple profiles, switching between them by toggling active lines in the same menu, all within seconds. Instant eSIM profile provisioning ensures the new plan becomes active as soon as the download completes, often without a restart.
Q: Can I add a new data plan without touching a physical tray if my phone is currently using a physical SIM?
A: Yes, as long as your device supports dual SIM capability (eSIM plus physical SIM), you can add the eSIM data plan through settings while keeping your existing physical SIM active. The eSIM profile sits independently on the embedded chip, so the physical tray remains untouched and functional for calls or texts on the primary line.
Switching Between Active Profiles and Setting a Default Line for Calls and Data
Once multiple eSIM profiles are installed, switching between them is done via your device’s cellular settings, not by physically swapping cards. In the “Cellular” or “Mobile Data” menu, you can designate a default line for calls and data, which determines which profile handles outgoing calls, SMS, and internet traffic. To switch active profiles, simply tap the desired line and select “Turn On” or “Use as Primary.” For calls, choose a default voice line, and for data, select a separate default if you want to split usage; otherwise, both use the same primary profile. Ensure the non-active profile remains enabled for receiving calls, but set “Cellular Data Switching” to avoid manual toggles when one network drops. This setup lets you, for example, keep a local data plan active while using your home number for calls.
Switching active profiles is a matter of toggling lines in settings; setting a default line for calls and data routes all primary activity to one chosen eSIM, with automatic data switching as an optional fallback.
What Should You Know About Security, Storage Limits, and Transferring Your Digital Profile?
Your eSIM’s security hinges on the device’s locked screen and your carrier’s remote provisioning—if your phone is stolen, the profile can be remotely wiped, but a lost QR code means you must contact the carrier to reissue it. Storage is tight: most phones hold only 8–20 eSIM profiles, and installing a new one when slots are full forces you to delete an inactive profile—your travel plan, say—before reactivating it later via the same QR code or a carrier app. Transferring your profile between phones is not a copy-paste; you must deactivate it on the old device first, then scan the QR or use the carrier’s app on the new one. Can you move an eSIM without the original QR code? Usually not—carriers require the QR or an app-based re-download, so keep that code saved offline, because losing it locks you out until support verifies your identity.
How Many Plans Can You Store and How to Delete an Old One Safely
Most phones allow you to store **between 5 and 20 eSIM profiles** simultaneously, though the exact number depends on your device model and chip capacity. To delete an old one safely, never remove it while you are actively using it for calls or data, as this can corrupt the profile. Instead, go to your device’s cellular settings, select the inactive profile, and choose “Remove” or “Delete.” For a guaranteed clean wipe, follow this sequence:
- Confirm the old plan is switched off and not set as your default line.
- Back up your eSIM’s QR code or activation details in a secure password manager first, in case you need to reinstall it later.
- Remove the profile from your device’s settings, then restart the phone to clear residual network cache.
Only delete a plan after confirming your new profile is fully active, and never factory-reset the device as a shortcut—this can lock the eSIM to the old carrier and prevent future transfers.
Moving Your Mobile Number to a New Phone: What Works and What Doesn’t
Moving your mobile number to a new phone with an eSIM depends entirely on your carrier’s transfer method. Quick-transfer compatibility works only when both devices run the same operating system, allowing direct eSIM profile migration via Bluetooth or a local network. Cross-platform moves (iOS to Android or vice versa) typically fail this direct method; you must instead scan a new QR code from your carrier’s app or website. Some carriers offer a manual eSIM activation code, but re-downloading the profile often requires a fresh QR or confirmation SMS. A physical SIM swap is the only universal fallback—if your phone lacks a slot, contact support for a remote reprovisioning. What never works: copying the eSIM file from one device to another like a regular photo.
Common Pitfalls and Troubleshooting Tips When Using an Embedded Mobile Chip
When your eSIM fails to activate, the most common culprit is a mismatched profile, so always verify the QR code matches your device’s IMEI before scanning. If you lose connectivity after switching phones, deactivate the eSIM on the old device first; otherwise, the carrier’s server may lock the profile permanently. A frequent pitfall is deleting the eSIM while traveling—without a backup QR code, you’ll be stranded, so download and store your activation details offline before departure. For persistent “no service” errors, toggle airplane mode for 30 seconds; this forces the chip to re-register with the network. If that fails, manually reset network settings, but note this clears Wi-Fi passwords too. Never force-remove an eSIM during a pending carrier update, as this corrupts the profile. Yet, the true nuance is that most “bricked” eSIMs are actually recoverable via a carrier-side re-provisioning request, not a hardware issue. Finally, check that your plan isn’t tied to a single country; roaming gimmicks often masquerade as hardware failures.
What to Do If Your Downloaded Profile Isn’t Showing Up or Has No Signal
If your downloaded eSIM profile isn’t appearing or shows no signal, first force a restart—this often triggers the carrier profile to register. Next, verify that the profile is actually installed under **Settings > Cellular/Mobile Data**; if absent, re-scan the QR code or re-enter the activation code, ensuring you’re not on Wi-Fi during the download. For no signal, toggle Airplane Mode for 30 seconds, then manually select your carrier in network settings. If the issue persists, check that the eSIM isn’t set to “Off” for your active line and that APN settings match your carrier’s specifications. Finally, delete and re-add the profile after confirming your plan is active with the provider.
Q: What should I do if my downloaded profile has no signal after installation?
A: Confirm the eSIM line is enabled, manually switch network selection to your carrier, update APN fields, and test the SIM in a different device if possible—if still dead, request a new QR code from your carrier and reinstall the profile.
Why Your Device Might Say “No SIM” and How to Fix Connectivity Issues
A “No SIM” error with an eSIM often stems from a profile that failed to activate or was accidentally deleted. First, verify that the correct eSIM profile is enabled in your device’s cellular settings; if multiple profiles exist, a mismatch triggers the alert. Next, toggle Airplane Mode for 30 seconds to force a network re-registration. If the error persists, removing and re-downloading your eSIM profile reliably resolves corrupted data. Also, confirm your carrier’s coverage in your area, as roaming gaps mimic a missing SIM. Finally, update your device’s carrier settings—outdated configurations frequently cause the software to misread the embedded chip.